As soon as school was out, I spent time helping my mom get her classroom packed for the summer. Then onto the Model A National, that the Model A Club that my family belongs to, where my husband was introduced to the way I spent my summers.
But onto the exciting part: Yahtzee
For the last few years, I have seen people who have made dice for Yard Yahtzee, and I have wanted to make them. But haven't had the opportunity. Since I am no longer working in the summers, I figured it was the perfect time to tackle this project. Not to mention, spend some time with my dad, who had all the tools to make this project happen!
So to start, I went to Lowe's and purchased a 4x4 piece of lumber. It cost $10.67 for a 4x4x8 piece of untreated lumber.
When you are looking for a piece of lumber, make sure you find one without any cracks in it. Or, as few cracks as possible.
The 4x4x8 allowed me to make 4 sets of dice. If you don't need that many, buy a smaller length 4x4.

Most 4x4's are actually 3.5" wide. Measure yours to make sure you know how wide it is.
Dice are cubes, so you will want yours to be as close to a perfect square as possible.
Cut 5 pieces that are 3.5" long. I had my dad help me tackle this part of the project, he sliced the dice into 3.5" pieces, and I cleaned up all the saw dust!

Once that is done, you need to measure out your dots on the faced of the dice.
The easiest way to measure them out is to use a ruler and measure on the diagonal.
If your 4x4 is really 3.5x3.5, then your diagonal is 5 inches long.

I just googled an image of a flat dice so that I had the exact placement of the dots.
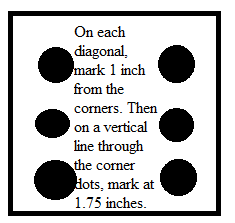
I made a diagram showing the placement, as well as giving measurements for each of the dots. All of the placements can be easily made with using the diagonal line with a ruler.
 |
| Side One |
 |
| Side Two |
 |
| Side 3 |
 |
| Side 4 |
 |
| Side 5 |
 |
| Side 6 |
Marking the dots on the side of the die is the most time consuming part of the process. After marking several of the dice, it will become very easy.
Once all the dice have been marked, you will need to use a Forstner bit to drill the holes. I used a 5/8 inch Forstner bit, Again, my dad had the bits and the drill press, all he did was show me how to use it and I went to town.

Here you can see what the dice will look like once you have drilled the dots.

If you do not have access to a drill press and/or Forstner bits, you could use a circle wood burning tip to create the dots on the dice. I have also seen this used in some on my perusings on the internet. I have not tried this, but like I said, if you don't have a drill press or the bits, the wood burning idea may be better, and definitely cheaper than buying a drill press, unless you are like me, and have a dad who has a lot of helpful tools.
After my dad and I spent Sunday cutting the die, and drilling the dots, he was determined that I learn to drive the Model A. And I did!

Without stalling!
Here you can see what each side of the die will look like.


Once all the dots are drilled, you need to sand the rough edges to smooth out the side of the dice. My dad hooked me up with some 80 grit sand paper, and it worked to smooth out the imperfections in the wood.
On this die, you can see that the side of it is very rough.

But with a little setermination, and my sander, I smoothed it out. See below.

The side was definitely a lot smoother, but I wanted to sand it a little further, and this is what I ended with.

On this piece, can see that the saw did not get a perfectly clean cut all the way across, but again with that same determination and sanding

After a little sanding, this is what it looks like.
It now looks like this.

It took me several days because it was a long slow process, but I didn't want to take short cuts and not be happy with the end result.
And after I had hand sanded each of those, I decided to take my dad's advice and use his electric sander. Definitely did a much better job of getting a smooth finish on the dice. I even roped my hubby into helping!

Be sure to sand all sides of each die. Some will need more sanding than others. The cut ends will likely need the most.
Next step, stain (or paint). I have seen some painted dice, but, again, I have never personally done it.
I purchased a small can of stain. It's about the size of a paint sample. But I figured it would be perfect to decide if it was the color I wanted to stain all the dice. Pick a stain of your choice to help seal the dice, as well as give them some subtle color.


After the stain has dried (I waited a week because I had gotten so busy!), you need to paint the dots on the side of the dice.

I found a small can of Valspar Black Gloss Paint at Lowe's. It's a half pint and was $4.69. It definitely is way more than I will need for the dots on the dice, but I plan to make several more sets, and I am sure I will use it in other projects too.

Here you can see the difference between the unpainted dot and the painted dot. You don't have to paint the dots, but I think it really completes the look of the dice.

When I was painting, I painted the same number on each dice to make sure that I wouldn't miss any sides.

And now all the dots are painted!
Long before I ever started this project, I found a score sheet for Yahtzee and Triple Yahtzee, so I bookmarked the link to have when I finally got the game made. You can find the links below or visit www.memory-improvement-tips.com and find them, as well as browse through all the other things they have.
In my browsing after the fact, I also found a Team Yahtzee Printable, as well. I've never played Team Yahtzee, but I can't wait to try it!
I printed off 6 Yahtzee Sheets, 4 Triple Yahtzee Sheets, and 2 Team Yahtzee Sheets. I then attached the Triple Yahtzee and Team Yahtzee to the back of the Yahtzee sheets with double-stick tape and laminated them.
I purchased thin whiteboard markers from Dollar Tree (4 in a Pack for $1) to include with the dice. While I was at the dollar store, I also purchased handled baskets from Dollar Tree as well, I believe they are intended to be laundry baskets, but why not use them for Yahtzee??
Here you can see the baskets that I used for the dice.
These would make a great gift. Definitely fun to make, and handmade from the heart!
To make Yahtzee the perfect gift, all you need it to make the dice out of a 4x4, paint or stain them, print the Scorecards, laminate them, get a few whiteboard markers, and some sort of bucket or basket for rolling the dice (and it will store everything too!)


Next step, play Yahtzee with family!
I'll have to add some pictures when we actually get a chance to play!
Happy DIY-ing and enjoy the rest of the summer and as always, embrace your imperfect slice of life!
No comments:
Post a Comment