In case you weren't sure, I loved DIY-ing. My friends and family who follow me on Instagram know this as two of my favorite hashtags are #DIYandCraftObsession and #DIYattheEisenmanns
Lately, String Art is all the rage, so of course I had to give it a try!
I pride myself on having a very positive message when people come to our home, even though at times I feel that I am not a very positive person. And lately, the frustration of not having a teaching position has been getting me down in the dumps. While scouring the internet for the perfect String Art image to make for our home, I saw an example of a String Art arrow and thought it was super cute. And in all of my trying to keep positive about the lack of teaching position, I am reminded that I must stay true to myself and continue to follow my dream of being a teacher. No matter what discouragement comes my way. So it was decided, the arrow was just what I needed, and I decided that I would write "Follow your arrow".
So I began my search for all the things I needed. I had plans with a friend of mine to do some running around, so we stopped into Home Depot and looked at the different sizes or boards that I could purchase. When I went in, I had the intention of buying a 1x6, but as I looked at the 1x6, I didn't think it was wide enough for what I was picturing (I also had another idea and surprise up my sleeve, but I'll tell you about that later).
So, I looked at all the different sizes and with the help of my friend, I decided on a 1x10x6. The gentleman who helped us locate the right size also took care of cutting it for us. Most stores offer so many cuts for free and then a charge for the rest, but the very kind gentleman said not to worry about the cost of the cuts. He was very kind and willing to help, proof their are still so many good people in this world. The 6 foot piece of 1x10 was $7.72, and I was able to get 6 pieces that were 9 and 3/8 inches long, and one smaller leftover piece, I'm sure I can use it some how. I also picked up a package of #18 3/4 wire brads for $1.30.

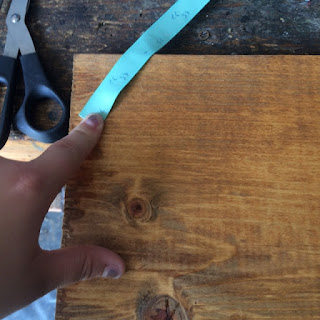
I also went to Hobby Lobby and looked for the perfect color of string. I settled on a beautiful minty green color, and I found a roll of ribbon that is minty green and matched the string, plus it had arrows on it. PERFECT! I knew I could use it at the hanger for my beautiful String Art!
So, my first step, sand the wood, just to be sure it is smooth!

Next step, stain the wood. I used the same color of stain that I had used on the Yard Yahtzee dice that I finished up a few weeks ago.


I nailed in a few points to be sure the template didn't move. If you use tape, you can take it off once you've nailed down a few points.


 Continue until one section is done and move onto the next.


And then on the last time around, I tied it off around the center nail and the string that makes up the shaft of the arrow.


 I started the same way, I tied it at one point, and then started winding it round and crossing the string to help fill in the anchor shape.


I also went to Hobby Lobby and looked for the perfect color of string. I settled on a beautiful minty green color, and I found a roll of ribbon that is minty green and matched the string, plus it had arrows on it. PERFECT! I knew I could use it at the hanger for my beautiful String Art!
 |
| Ribbon was on sale when I purchased it for $1.49 |
 |
| The thread was 30% off when I was purchasing my supplies, so I got it for $2.37 |
So, my first step, sand the wood, just to be sure it is smooth!

Next step, stain the wood. I used the same color of stain that I had used on the Yard Yahtzee dice that I finished up a few weeks ago.

After I let the first coat dry, I decided I wanted it to be a tad bit darker, so I out another coat of stain on the wood and I feel like it gave me the perfect color!
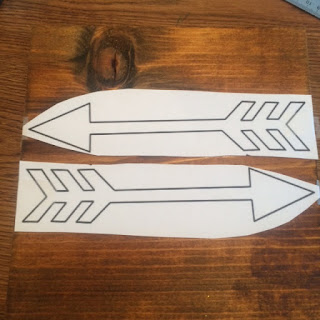
Next step was to nail the design into the wood. I had printed out two arrows to use as a template so that my designs would be similar.


Tape template down so that it does not move.

I nailed in a few points to be sure the template didn't move. If you use tape, you can take it off once you've nailed down a few points.

I continued to nail the design down. As you can see, I didn't follow the template exactly because I had a specific look I was looking for. So I improvised.


Once all the nails were hammered in, I removed the templates.

To start, tie around one point, and start to wind/weave around the nails creating the design in the manner you want.


I then ran the string up the "shaft" of the arrow, and ran it around 3 times, then I moved onto the arrowhead.

I just started at one point, and then kept moving around the arrowhead until I had covered all parts.


And to finish it off, I ran the string around the perimeter of the arrowhead three times.


Viola!

The arrows are completed.
I then used a staple gun to attach the ribbon hanger to the back of the piece of wood.

I also completed an Anchor piece for one of my very dear friends. Below you will see how I completed the anchor. I used the exact same steps as the Arrow String Art.


 |
| This is the string I used for the Anchor String Art. It was on sale for $1.99 when I stopped in, so I picked it up. |
 |
| I used Jute to look like rope wrapped around the anchor. I purchased this at WalMart for $2.96 |

I burnt the ends of the jute to try and keep it from fraying as best I could.

Before I started stringing, I wound the jute through the nails so that I wouldn't have to try and feed it through once the anchor was done.


Hopefully this will help you to complete any String Art projects you may try to tackle.
Well this was definitely a challenging DIY for me, but I enjoyed it, so I hope you are able to enjoy your imperfect slice of life!


