Wednesday, October 26, 2016

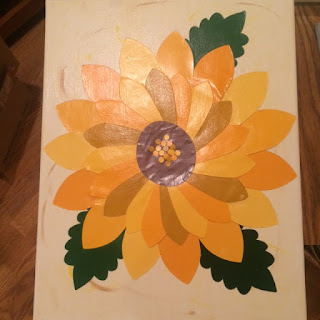
Sunflower Decoupage Canvas (Step-by-Step Directions)

This post is very similar to my post on the "Happy Fall Y'all Decoupage Canvas", you can see it here.

I had so much fun creating that one that I decided to create a sunflower canvas in the same way. 

And, I was able to use my newly acquired Cricut, so what else could be better?

Sunflower Decoupage Cavas Tutorial

view tutorial at imperfectsliceoflife.blogspot.com


So, the next time I headed to Hobby Lobby when papers were half off, I picked out several different shades of yellow and burnt yellow to use for the petals of my sunflower canvas. I figured I could use the same marbled brown paper for the center of the flower so that saved my from having to buy any more. I figured I could use the same orange gingham ribbon I had used on the Pumpkin Canvas, so I didn't buy any more. And I had an 11x14 Canvas on hand from a previous project, as well as the Matte Mod Podge, and acrylic paint.

Just like the other canvas, first, I painted the canvas.
I loved the Antique White Paint I had used on the last canvas, so I used it agin (purchased at Miejer).

Because of the antique white color, it caused the paint to have a little variation, which I loved!


Let the paint dry.

These are some of the colors I chose to make the sunflower.


While the paint dried, I set my Cricut up to cut the petals for the Sunflower. 

I had the cricut cut 2 inch petals and 3 1/2 inch petals.
I also used the Cricut to cut the circle center for the sunflower.


On the last canvas, I was so happy with the way the marbling turned out with the yellow and orange, I decided to do it get. But this time I wanted to use yellow and brown.
I again added small swooshes of Sunflower yellow (purchased at Hobby Lobby when they were 30% off)


And then I added some brown - I absolutely love this as well!!

Next I assembled the flower, I did this all before I Mod Podged it to the canvas
I just simply used Elmer's Glue to glue the petal to the center of the sunflower. I stared with a repeating pattern of the three smaller petals around the entire center.

It looked a little bit like a turkey! But this is what it should look like.

Once the flower was filled with the smaller petals, I added the larger ones around in a repeating pattern again. 


I put the Sunflower on the canvas, but it needed somethig else.....
Leaves, so I grapped a piece of green cardstock and I cut three 3 1/2 inch leaves, and added them to the back of the flower. 

Then I began Mod Podging, again I used the Matte Finish on this project. 


I always use foam brush to help me coat the canvas with the Mod Podge. 
I decided I would use my Matte Finish Mod Podge to help with creating the fall feeling of the canvas.
I purchased this at Hobby Lobby with a 40% off coupon.

I coated the entire Sunflower with Mod Podge and let it dry over night. 

Once it was dry, I hot glued the ribbon to create the hanger. 


A wonderful addition to any fall decor you have in your home.


Take in the sunflowers, and enjoy your imperfect slice of life!


Saturday, October 8, 2016

Pumpkin DecoMesh Wreath (Step-by-Step Directions)


Materials:
5 1/2 inch wide Orange DecoMesh -I purchased mine after Halloween in 2014 at Hobby Lobby, so I got it for $2.39 a roll. I bought 3 rolls, but only used one. If you purchased it leading up to Fall, you can get it anywhere between $4.99 and $7.99
Wire Wreath Frame -I used a 14 inch wreath frame that I purchased at Pat Catan's for $2.79 - you can use any size wire wreath frame, the larger it is, the more DecoMesh it will require-
Orange Paint - I used acrylic paint because I had it on hand, truthfully, Orange Spray Paint would have been MUCH easier, but I didn't see the need to purchase it, so I made the acrylic work - it was left over from a previous project
Orange Pipe Cleaners - I purchased a pack of 25 at Pat Catan's for 83 cents
Hot Glue Gun & Hot Glue
Green DecoMest - I purchased this while it was half off at Hobby Lobby, so I got it for $2.99  (I have a ton left over, so I will have it use for other projects) this is for the stem. If you don't want to buy it, then make a stem from something you have at home
Ribbon - I used some orange I had left over from a Wedding project, but really you can use anything to have a wreath from

Step 1: Paint the Wire Wreath Frame (in case it shows through you want it to be less visible). Like I said, I used acrylic because I had it. But spray paint would have been sooo much easier!

Step 2: Attach Pipe Cleaners, I started by attaching them to the braces. Twist them around twice.

In spots where there were not braces, I out a dab of hot glue to attach them. 

Twist twice and add a little more glue.

For my 14 inch wreath, I use five across the top and five across the bottom.

This is the DecoMest I used

Step 3: Begin by bunching up the DecoMesh and attach it to the back of the wreath frame with the pipe cleaners. 

Always Twist Twice


Step 4: Take it down to the bottom, attach it to the pipe cleaner. 

I decided I wanted it to be fuller, so I went over it again with a second layer. 
  

Step 5: Continue with the whole wreath. This is basically where you will find what will work best for you, so do it. I went over each section twice, and there were five sections across the frame. 
After I had filled all the pipe cleaners, I went back through finished up the roll and attached more, using more pipe cleaners to make it more full. I wanted a plump pumpkin!

The back of the wreath should look something like this


Step 6: Tuck all your pipe cleaners into the back of the wreath, that way they aren't sticking out every which direction.
This is what the front should look like.


DecoMesh for the stem

Step 7: Cut a piece of Green DecoMesh about 2.5 feet long and roll into a small tube to make it a stem. Like I said earlier, if you don't want to buy a roll, then use something you have at home, like toiled paper tube and paint it. 


Step 7: Attach it with a pipe cleaner to the back of the wreath


I decided to add some Deco Ribbon Tubing that I had purchased for a different project, but I haven't used yet. I attached them to the back with a pipe cleaned as well. I thought it would make it look a little like vines :)


 Step 8: Cut a ribbon long enough to use as hanger. Tie it to the back of the frame using double knots.
Hang up your Pumpkin Wreath. You will probably have to go back and fluff. I pulled at the layers to make them "stand up" a bit, to give the pumpkin some definition. The nice thing about DecoMesh is that is gets caught in it self, so it is easy to make it pouf out more.

Just take some time and enjoy the fruits of your labor, and your slice of imperfect life!